Sunday, September 27, 2009

Autumn Spiced Caramels


I was craving caramels, so I decided to whip up a batch of my favorite fleur de sel caramels. I felt like making them a little different, and in honor of the coming fall season, I decided to add some spices. I mixed a blend of cinnamon, ginger, cloves, and nutmeg to add to the caramels. While the sugar, water, and corn syrup boiled, I heated the cream, butter, and spice mix. When the sugar had turned a light caramel color, I added the cream mixture and let it cook until it reached 248 degrees. I poured the hot caramel into a lightly greased 8" square pan and let it cool for four hours. I cut the caramels into squares and dug in! I think that the spiced caramels were a nice change from the traditional. You can definitely taste a hint of the spices, but the flavor is not overwhelming. I enjoyed the caramel with a granny smith apple, and added spices made it taste like I was eating a piece of apple pie topped with caramel! The only thing I will do different next time is cook the caramel a little longer so it holds its shape better when cut. I am already looking forward to making these again and dipping half of them in chocolate and using the other half to make unique caramel apples.

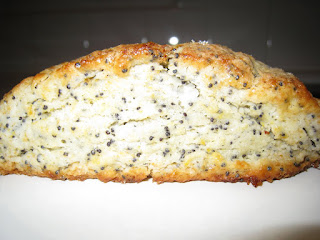
Lemon-Poppy Seed Cream Scones


Scones! If you've never had a scone, they are like a cross between a muffin and a biscuit--slightly sweetened with somewhat flaky layers. I chose to make one of the variations on the plain cream scone, opting to add lemon zest and poppy seeds. I started by blending the dry ingredients (four, sugar, baking powder, salt, lemon zest, and poppy seeds). Next, I cut butter into 1/4" cubes and chilled them in the fridge for 30 minutes. Next, I used a pastry butter to cut the butter into the dry ingredients until the butter was the size of small peas and evenly dispersed throughout the flour mixture. Next, I added the heavy cream and used a spatula to mix everything together. The dough was a little crumbly (as expected) so I dumped it onto the counter to bring it all together. I shaped the dough into an 8" disc and used a chef’s knife to cut eight even wedges. I placed the wedges onto a baking sheet and brushed each with an egg wash and topped them with sugar. The scones baked for 19 minutes in a 425-degree oven. I thought the scones came out great--I could really taste the lemon zest and I happen to love the slight crunch of poppy seeds and it was a way better breakfast than cereal!
Next: Chocolate Toffee Scones

Mozzarella, Roasted Pepper, and Basil Muffins


The great thing about muffins is that they can be sweet or savory, and this recipe is a great example of the latter. I started by prepping the ingredients--I finely chopped the fresh basil, cubed the mozzarella, and cut the roasted bell peppers into a small dice. Next, I mixed the dry ingredients in a bowl (flour, salt, baking powder, baking soda) and the wet ingredients in another (buttermilk, olive oil, and an egg). I gently mixed the wet and dry ingredients just until they were combined--the key to a tender muffin is not to over mix the batter. I gently folded in the cheese, peppers, and basil until they were evenly distributed. I used an ice cream scoop to evenly divide the batter into twelve muffin cups, and baked for 18 minutes at 375 degrees. The finished muffins were delicious--and I wish I had made some sort of Italian dinner to complement them! The cheese was melted and gooey and the basil was a nice complement to the slightly sweet peppers. These muffins were a breeze to make and I think they would be a delicious addition to the next Italian meal I make.

On deck: Lemon-Poppy Seed Cream Scones

Easy Morning Muffins with Blueberries


Unlike pastries, muffins are uncomplicated, simple, and still extremely satisfying. This recipe for blueberry muffins was fun to make because I didn't need a mixer and the entire recipe was finished in a few minutes. Like all quick breads, the recipe began by mixing the dry ingredients in one bowl (flour, salt, baking powder, baking soda, sugar) and the wet ingredients in another (buttermilk, eggs, vanilla extract). I also melted some butter on the stovetop and added the zest of one lemon (the heat from the melting butter helped to infuse the aromas from the lemon zest). I gently mixed the wet and dry ingredients--being extremely careful not to over mix the batter. I folded in one half pint of blueberries and used an ice cream scoop to fill a greased muffin tin. I sprinkled a blend of cinnamon and sugar over the top of each muffin and baked in a 400-degree oven for 15 minutes. The muffins came out great--and by not using muffin liners the edges crisped all over creating a pleasant contrast of textures. I thought that the lemon zest and cinnamon/sugar mixture both added unexpected but delicious flavors to an otherwise standard blueberry muffin. The muffins will be a welcome addition to my repertoire and the best part is, they couldn't be easier!

Next up: Mozzarella, Roasted Pepper, and Basil Muffins

Parmesan-Herb Popovers


I finally made it to chapter 3--Quick Breads! I really enjoyed baking the layered pastries in chapter 2, but I am excited for the more instant gratification that quick breads have to offer. The first recipe was popovers-a recipe that I had never tried before. Popovers are a culinary slight of hand--a few simple ingredients create an impressive amount of height. This version included an addition of Parmesan and fresh thyme for a little extra flavor. To start, I preheated a muffin pan in a 450-degree oven for fifteen minutes while I prepared the batter. Next, I mixed the dry ingredients in one bowl (flour and salt) and the wet ingredients in another (eggs, milk, melted butter). After thoroughly blending the wet and dry ingredients I added in the cheese and herbs. I poured the batter into the hot muffin tins, rather than the usual popover pans. While the popovers didn’t rise as high as in a popover pan, they still puffed up a considerable amount. Overall, the popovers weren't as tasty as I hoped for--they had a very eggy flavor with a moist texture. I did like the crispy exterior, but that was not enough to convince me to make this recipe again anytime soon.

Coming soon: Easy Morning Muffins with Blueberries

Sunday, September 20, 2009

Moroccan-Spiced Sweet Potato Tiropetes


Tiropetes are small triangles of phyllo dough stuffed with a savory filling. This recipe began by baking the sweet potato that formed the base for the filling. While the potato baked, I created the Moroccan spice blend by toasting fennel, cumin, coriander, and black peppercorns in a skillet. Once the spices had warmed, I added them to the grinder with paprika, ground ginger, and cayenne, and ground them to a fine powder. I sautéed a chopped onion and two cloves of garlic and added them to the cooled, peeled sweet potato. I mashed the onions, garlic, and sweet potato and added 1-½ teaspoons of the Moroccan spices, and a tablespoon of fresh cilantro. Now I was ready to create the tiropetes! I layered three sheets of phyllo dough (with butter between each layer) on my work surface and cut the dough into four equal strips. At the bottom of each strip, I placed a tablespoon of the potato mixture. Starting at the bottom right hand corner, I folded the tiropetes like I was folding a flag—creating a neatly wrapped triangle. I brushed the triangle with butter and continued the process until I had used all of the filling. The tiropetes baked in a 375-degree oven for 20 minutes. The Moroccan spice blend filled the house with an intense earthy, smoky aroma. I really liked the way the crispy, flaky phyllo dough contrasted with the creamy sweet potato filling. I think this would make a great appetizer and I froze half the batch to save for another time.

Up next: Chapter 3! Parmesan-Herb Popovers

Roasted Apple Strudel with Cranberries and Raisins


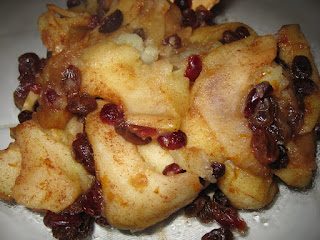
Traditional strudel dough is hard to master at home, so Mushett offers a recipe using a close substitute—phyllo dough. To start, I created the apple filling (a mix of apple slices, lemon juice, whiskey, cinnamon, and reconstituted raisins and dried cranberries). The filling baked in a 375-degree oven for 20 minutes to soften the fruit. While the fruit was in the oven, I diced walnuts and mixed them with sugar and cinnamon to create the filling that would go in between the phyllo layers. Next, I placed a sheet of phyllo on the counter and brushed it with butter, and then layered another sheet of phyllo on half of the sheet below to create a large rectangle. I sprinkled 1/3 of the walnut mixture on top and placed two more sheets of phyllo down. I repeated this process twice more, using a total of 5 layers of phyllo. I spooned the fruit mixture down the middle of the dough and carefully rolled the phyllo up into a long log. After scoring the top of the strudel, I baked it for 30 minutes. I think that I overstuffed the strudel, because when I took it out of the oven, it had split in several places (lesson learned for next time). Despite its ragged appearance, I have to say that the strudel tasted delicious and reminded me of the flavors of fall. The tart cranberries were a nice contrast to the sweet apples, and the flaky phyllo provided a nice contrast in texture. I look forward to trying this recipe again, but modifying the amount if filling I use.

Next: Moroccan-Spiced Sweet Potato Tiropetes

Classic Baklava with Pistachios and Cardamom


However you say it, Baklava is delicious! Before making this recipe I had never tried this Greek pastry, so I wasn't sure if I was going to like it or not. Baklava is made with flaky phyllo dough, layered with a mix of pistachios and spices. I did some research on the best frozen phyllo dough and decided to track down the Athena brand (I finally found it at the East Village Albertsons). The phyllo defrosted in the fridge overnight before I started to assemble the Baklava. While the phyllo came to room temperature, I made the nut mix by blending pistachios, sugar, cinnamon, and cardamom in the food processor. To start the Baklava, I brushed a thin layer of butter in the bottom of my 9x13" pan and placed the first sheet of phyllo on top. I brushed the phyllo with melted butter and topped with another sheet of phyllo--repeating this until I had a stack of 10 sheets. I sprinkled half of the nut mixture on top and then proceeded to layer/butter another 10 sheets of phyllo, repeating the process until I had forty sheets of phyllo dough and three layers of the nut mixture. I let the Baklava chill in the freezer for 30 minutes while the oven preheated to 350 degrees. I scored the Baklava into 2" diamonds and baked for 40 minutes. When the Baklava came out of the oven, I topped it with orange blossom water infused simple syrup and let it cool overnight. The finished Baklava was flaky, crispy, chewy, and very flavorful. Overall, I really enjoyed the flavors, but it was a little too sweet for me (lucky for me, Ryan seemed to enjoy it and had no problem finishing it!).

On deck: Roasted Apple Strudel with Cranberries and Raisins